Removing the radiator and fan – Golf 4 and Bora

Removing the radiator and fan – Golf 4 and Bora:

Before you decide to replace the radiator, take it to a specialist workshop. Professionals can seal small leaks. Maybe the radiator can still be saved. Good work: if your car is equipped with an automatic gearbox, commission to a workshop to remove the radiator. The engine radiator in this version is one unit with the ATF oil cooler; it is necessary to disconnect the wires leading to it. Refilling the gearbox with ATF oil would be quite a problem.

1. Remove the front bumper. Read how to do it in the chapter "Body".

2. Drain the coolant (read the section on changing the coolant).

3. Remove the hoses from the radiator. Pull out electrical connector plugs from thermal switch and fan.

4. Remove the power steering oil cooler, but do not disconnect the wires, so that the oil does not leak from the system.

5. Remove the screws that secure the air outlet grille.

6. In cars with air conditioning: loosen the refrigerant piping clamps and unscrew the evaporator mounting bolts.

ATTENTION! DO NOT OPEN THE AIR CONDITIONING REFRIGERANT CIRCUIT!

7. Pull out the electrical connector plug from the air conditioning pressure valve.

8. Carefully remove the evaporator and secure it with wire to the body sheet.

Important: cannot be bent, Crush and twist refrigerant pipes and hoses, in order not to damage the hoses and the evaporator.

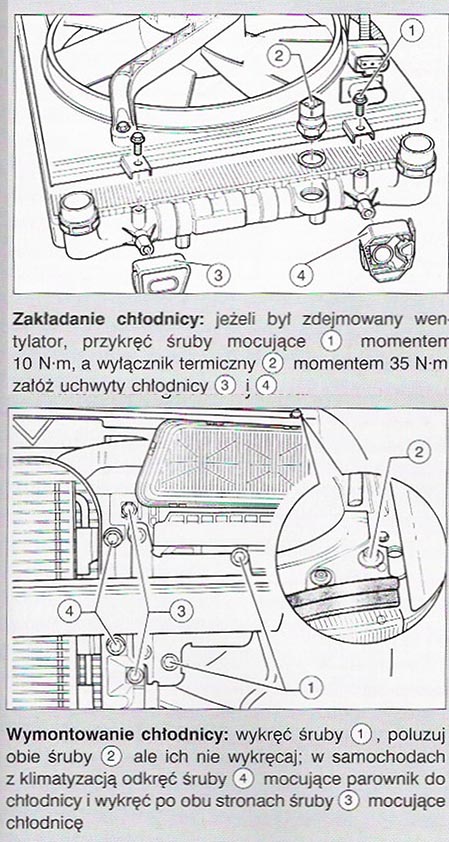
9. Set the front belt in the service position and remove the radiator mounting bolts. Remove the radiator with the fan from the engine compartment.

10. With the help of a second person, put the radiator in place and tighten the mounting bolts with torque 10 N-m.

11. Fit new O-rings and fit the hoses to the radiator nozzles. Secure them with new zip ties.

Checking the operation of the fan – Golf 4 and Bora

Fan failure

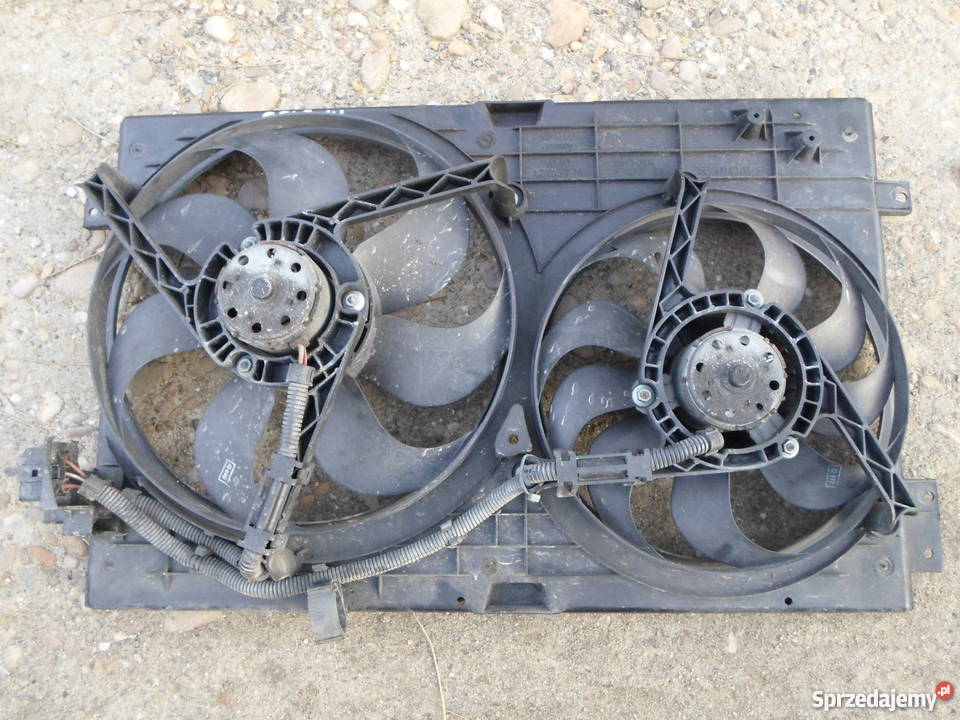
The radiator fan turns on only at high engine loads. In the event of its damage, you do not have to give up driving. Allow the engine to cool down and continue driving at a moderate speed, preferably to the nearest workshop. Avoid driving very slowly and idling the engine, because then there is negligible flow of cooling air around the radiator plates. Keep the temperature gauge and indicator light in view.

attention. Under no circumstances put your hands near the fan when the engine is still hot. The fan may start even after the ignition is turned off.

Checking the operation of the fan:

1. Start by checking the fuses no 3 i 8.

2. Pull out the electrical connector plug from the thermal switch, located on the left side, halfway up the radiator.

3. Turn on the ignition.

4. Connect the clamp 2 (+) with clamp 1 (white-red wire): fan turns slowly. Now connect the clamp (+) with clamp 3 (Red-black, sometimes a red-yellow wire): the fan turns fast. If the fan rotates in both cases, it means that the thermal switch needs to be replaced.

5. When the fan in both cases does not start to rotate, or it only works at one speed, then it is necessary to check the electrical connections according to the diagram. Check all connectors, that they are not loose.

6. Alternatively, you also need to check the fan relay. It is located on the right side, on the last 13. place, in the bottom row of the additional rail, above the main board of the relays. After bridging the thermal switch, the relay contacts should close. Also check under the bonnet, front left, that the connectors are not loose 4- and 10-pin fan and control device.

7. You can check the fan motor, by removing the plug with the power cord from it and connecting instead to the contact with the red-black wire, the wire connected directly to the positive terminal of the battery. For contact with brown wire (in the engine 2,3 V5 – brownish black) connect the wire from the negative terminal of the battery. If now the fan does not start to rotate, it means, that the fan motor is defective, which needs to be replaced.

Removing and checking the thermostat – Golf 4 and Bora

Removing and checking the thermostat

Overheating of the engine while driving due to a damaged thermostat requires the car to be towed to a workshop or the thermostat removed. You have to wait with the repair until the engine cools down.

Depending on the type of engine, the thermostat is located in different places. It is usually mounted on the front of the engine block under the coolant hose mounting socket. In gasoline engines 1.4 l the thermostat is placed in a special housing at the end of the coolant pipe.

Before going to work, prepare the dish, to which you will drain the coolant, if the dismantled thermostat is found to be defective, it must be replaced with a new one. Thermostats cannot be repaired. By refitting a thermostat that is still operational, use a new gasket.

There is a way to check the suitability of the removed thermostat, however, this cannot be done on the go. Immerse the thermostat on the wire in a vessel with cold water. Heat the water and watch it, whether the thermostat starts to open at a temperature of approx. 86°C.

Thermostat opening temperatures

Engine type Beginning

opening

(at ° C)

Full

openly

(at ° C)

Jump

valve

(mm)

Petrol ok. 80-85 ok. 102-105 min 7
Diesel ok. 85 ok. 105 min 7

Check with a thermometer, that the thermostat valve extends the correct distance at the temperature specified in the table. For used thermostats, a tolerance of ± 3 ° C is allowed.
In the thermostat of a gasoline engine 1.4 l the valve stem should protrude at least by a distance 7 mm.

attention! A sticking thermostat can overheat and severely damage the engine. The boiling liquid reduces the cooling efficiency, if this happens to you while driving, stop immediately and tow the car to the repair shop.

Next steps:

1. Remove the noise canceling cover under the engine.

2. Remove the expansion tank cover to relieve system pressure. Drain the coolant from the system (see fluid change section).
attention. There is a risk of burns if the engine is hot. Drain the coolant from the system (see fluid change section).
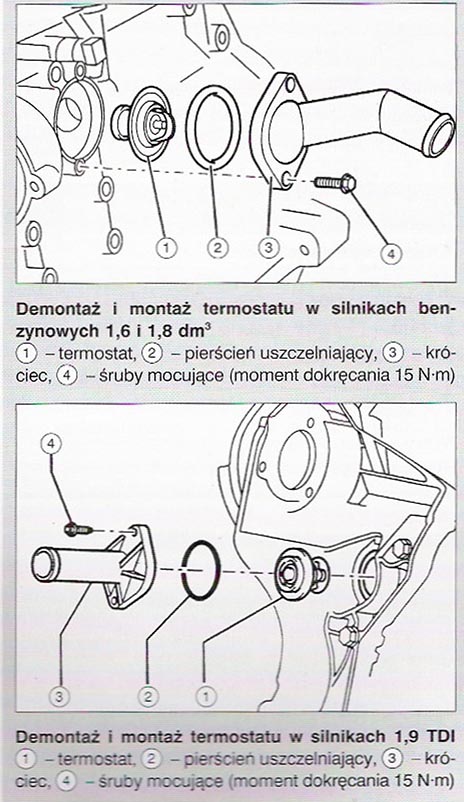
3. Remove the thermostat as shown in the picture. Remove the flexible hose from the fitting. Unscrew the connecting bolts and remove it together with the thermostat (in engines 1,9 TDI turn the thermostat counterclockwise by 90 ° and remove it from the socket).

4. Proceed as follows to assemble: clean the contact surface of the rest of the gasket, coat the new ring with G12, attach the socket with the thermostat inside to the engine block (in engines 1,9 TDI insert the thermostat into the socket and turn o 1/4 clockwise rotation). When inserting the thermostat, set the valve handle to the horizontal position. Tighten the mounting bolts (tightening torque 15 Nm).

5. To test a new or used thermostat, hang it on a wire in a vessel with water and heat it up. The valve should open at the temperatures given in the table.

6. Pour the coolant back into the reservoir.

7. Attach the noise reduction cover.

Typical thermostat malfunction.

Symptom of ailment The reasons
A. The engine is too slow to reach operating temperature, insufficient heating of the car The thermostat valve is stuck open (e.g. through the settlements), liquid flows through the radiator all the time and the engine takes too long to warm up. This will not damage the engine in a short time, but the thermostat must be replaced as soon as possible.
B. Coolant temperature control light is on despite correct coolant level. Radiator and lower radiator hose are cold The thermostat valve is stuck closed (e.g. due to a damaged or leaking thermostat sleeve). Under no circumstances should you continue driving, because you will damage the engine due to overheating.


Topping up of coolant antifreeze

Topping up of coolant antifreeze.

For total security, also in summer use the coolant z 40% admixed with antifreeze, if only water was added to the system frequently, the content of the agent in the liquid is too low for the winter. In addition, the boiling point of the coolant was reduced. In this case, add G12 antifreeze. To do this, drain the appropriate amount of liquid from the cooling system, to make room for refilling with G12. If you drive your car in a very cold climate, then the proportion of antifreeze can be increased to 60% (protection down to a temperature of about -40 ° C) but no more, because at an even higher concentration, the degree of protection deteriorates. For example, in a gasoline engine 1,6 l provides protection down to -25 ° C 40% antifreeze. i.e. 2 liters G12 and 3 liters of water; to protect to -35 C, the proportion of the measure is 50% (po 2,5 liter of water and G12). In the engine 1,9 These TDIs are respectively: (-25° / -35°C) 2,4 liter of water and 3,6 liter G12 / 3 liters of water and 3 liters G12.

Next steps:
Remove the noise reduction hood under the engine and place a clean vessel under the radiator drain valve.
Drain the necessary amount of coolant (read the section on fluid replacement).
Install the radiator hose and tighten the coolant drain valve.
Top up the appropriate amount of antifreeze in the expansion tank. If necessary, top up the level with the drained liquid.

Coolant is leaking from the system.
If the engine has lost a lot of coolant while driving, the defect cannot be replaced with cold water. The engine will then experience the so-called. thermal shock, which can lead to warping of the head. This would cause the cylinder head to leak and the coolant to enter the lubrication system. In the worst case, due to thermal shock, the engine block may crack. Wait for the engine to cool down, add water and try to find out the cause of the loss of coolant at your nearest garage.